Image Map

Just Uploaded-- Part 2 to My Read and Write the Room Bundle Series

This item comes from my Read and Write the Room Series.  Please click here for my original blog post about my Read and Write the Room Bundle.


This item includes over 50 pages of Word Hunts, directions, photographs and an answer key.   It includes a recording template and words to hide around your classroom for each hunt. They cover the following literacy skills all found in the Common Core, of course.


•Basic Sight Words
•Word Families/ Chunks
•Question Words
•Categories
•-ed and -ing Words
•synonyms, homophones and antonyms
•long and short vowels
•Magic E Words
•"Two Vowels Go Walking" Words
•Animals/ Baby Words
•Root and Base Words
•Contractions
•Bossy R Words
•Adverbs


There's much, much more too.  Here are some photographs of the first Scavenger Hunt up in my classroom.  Can you find the hidden sight words placed on apples?  Here is the word, "to."


Here is the word "of" above my "Pick a Prompt" Center.


OK, folks.   This one is easy.  If you look closely, you can see me reading to my dog, Toby!


Here is Fred, our class scarecrow, holding the word "I."


This item includes 19 Scavenger Hunts just like the one you see.  It has the record sheets as well as the words you hide around your classroom.  They can be printed on card stock or on labels and stuck to holiday/seasonal cutouts.  Click here to read more about this item in my TpT Store. 

New Item Posted: Speed It Up Fluency Center


I have just uploaded this over 80 page item which has all you  need to make over 350 fluent phrase/ sentence cards.  The item comes ready to differentiate according to the reading levels of your students.  It includes phrases/ sentences using
•the Pre Primer Dolch Word List (for K and struggling readers at the first-third grade level)
•the first 100 words from the Fry Instant Word List
•the second 100 words from the Fry Instant Word List
•the third 100 words from the Fry Instant Word List


I have these strips printed and laminated on card stock.  Each level of difficulty is a different color so I can keep track.  I use a simple count down/ count up timer.  The children time each other to see how many phrase/ sentence cards they can correctly read in a minute.  They love beating their own times, it's amazing!  Each time they practice, they are improving their reading fluency.  I use this center throughout the year and my students never get bored of it.  In addition, this is a great tool in tutoring, in pullout for students receiving literacy support as well as in after school programs.  This fun literacy center fosters repeated reading which gives students the needed practice of reading high-frequency words and developing fluency and proficiency which will boost comprehension.  

Click here to be linked to my TpT store where you will find this item. 


Mr. Giso's Room to Read's Bright Idea #8

Make a Class Set of Literacy Frames


Linda Hoyt is a personal favorite of mine.  She is the well known author of such books including Revisit, Reflect, Retell, Exploring Informational Texts and Make It Real.  You will find each of these three titles in my professional library.  This tip comes from Hoyt's Revisit, Reflect, Retell book-- both the older and the most recent addition should have it.  

She suggests using these "Literacy Frames" to serve as a visual for children to really look at a word that happens to give them trouble.  We often tell children to "sound it out" (as long as it's not a sight word with irregular spellings).  Many times we instruct readers to look for patterns in words such as "chunks" and "word families."  We may even see if the children can find what I call a "baby alert."  This is a smaller, "baby" word found in a larger word. such as seeing the word "cat-" in the larger word "catcher." Also, it's always a great idea to encourage children to use what they know about phonics.  Can they find a blend (cl-), digraph (-th), ending (-ing), etc.?

The "Literacy Frames" let readers interact with unknown words by first framing the word in its entirety and then honing in on the parts of the word that the children can decode.  It works because it's concrete!  As they sound out, they maneuver the frame.  Let's look at an example.


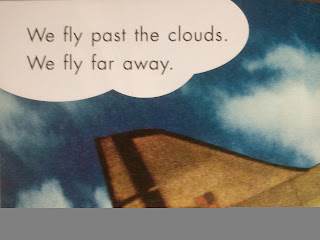
Say a student comes to the word "away" in the above text and is unfamiliar with the word.  To be successful, we must show the student how to dissect this word.  The "Literacy Frame" works by framing perhaps the "-ay."  The student may say "I know this says /ay/ because I know the word 'day.'"  "-ay" would be framed.  A child may also frame the first letter "a" and note that it either has a long or short sound.  In addition, the child may frame the word part "way" and read that first [see below], thus verbalizng that placing an "a" in front of "way" results in "away."  By maneuvering the frame, the child fully understands word attack strategies in a much more hands on manner.


I call these valuable tools our "Word Framers."  I have a box of dozens of them in my guided reading supply shelf.  Each time we read in guided reading, student take one.  Also, students know they can get up and get a "Word Framer" whenever they wish throughout the day.  I have sent these home with parents to use with at-home reading, have used them in reading clinics, tutoring, teacher training and in interventions.  They work really well!  I have a large size "Word Framer" [see top photograph] for me to model how to use the "Word Framers" by reading a big book or a chart.  Click here for a pdf file with the directions.  

What's Mr. Giso Making "Room to Read?" Pick #2

Kindness IS Cooler, Mrs. Ruler
By:  Margery Cuyler
Illustrated By:  Sachiko Yoshikawa


This is a terrific beginning of the year read aloud.  It's also the perfect book to take out when your students are having difficulty getting along and you need a fix, quick!  It's about a quirky teacher named Mrs. Ruler who is frustrated, one day at her students not getting along.  Raquelita is stealing a hat, David is pulling a ponytail and Anaya and her twin sister Tawana are talking to each other through story time.  "That's enough!  Too rough!" shouts Mrs. Ruler who talks in fun rhymes throughout the book.  The illustrations are bright and bold in warm colors.  The class is animated with bright eyes and wide open smiles.

Mrs. Ruler keeps her troublemakers in for recess and as a consequence has them perform five acts of kindness at home so that the students will learn how much better it feels to be nice.  In time, the plan works--even for the most tough student named David.  In this fun-filled adventure, the students in Mrs. Ruler's class end up making a bulletin board of over 100 hearts that record acts of kindness.  Mrs. Ruler's plan was extended to the whole class.  Her children marveled in the good feeling one gets from doing something nice for a friend, a family member or even a community!  The book has over 100 suggestions of age appropriate acts of kindness students can do.  It's a valuable lesson-making addition to your library for children of all ages.  As Mrs. Ruler says, "Don't forget--a slice of nice makes a mile of smile!"

Click here to get your free "all week printable" that goes along with this book.  It includes directions, a letter to send home and heart templates so that your class can celebrate random acts of kindness all year long!  Don't forget, ordering this book is a click away.  Scroll down to the bottom of my blog to find my picks from Amazon.com.

Mr. Giso's Room to Read's Bright Idea #7

Mystery Walker


Here's a great management idea that a graduate student of mine from last semester shared with me. (Thanks, Jenn!)  I always note how a classroom teacher's line of students is a public indication of his or her management skills--it's a preview of what goes on in his or her classroom.  If your student's are arguing, running, hopping, spinning, ripping displays off the wall, etc. chances are that there is not enough structure inside your classroom too.

This "Mystery Walker" idea is a fun way to reinforce appropriate behavior for walking in the halls of your school.  Locate some fun note paper, cutouts, etc. and write numbers depending on the number of students in your class.  I have 20 students so my cupcake cutouts (see below) are numbered 1-20.  If you assign your students numbers already based on alphabetical order like I do, you are all set.  If not, you need to assign your students a number based upon your alphabetical class list.  Place the numbers in a container.  The one pictured above was a coffee container decorated with contact paper and a label that reads "Mystery Walker."


Two or three times a week, I start the morning out by picking a number.  This person is the "Mystery Walker" of the day.  The students don't know who is the "Mystery Walker," so they all must be on their best line behavior!  At the end of the day, the "Mystery Walker" is revealed and is rewarded.  In my classroom, it's with play money to be used in Mr. Giso's Store.  Also, I have a "Wild" cupcake too.  When I pull the wild card, the whole class becomes the "Mystery Walker" and has the chance to earn a reward.  I suggest to do this periodically, as it will lose its novelty.  The goal is for your students to behave appropriately in line because it's the right thing to do--not because they may get a reward.  Use it once a week once until they meet your expectations.

On a final note, here's what good behavior in my like looks like.

1.  Each student is in his or her assigned order (always) based on last name.

2.  My line leader is always in the front.  (This job changes every Monday).

3.  Each student has his or her hands by his or her side.

4.  Students are faced forward, walking along the right side of the hall as close to the wall as possible.  

5.  There's no talking in order to not disturb other learners.

6.  Each child must hold the door (if there is one) until the student behind him or her is able to hold it.  There are no "door holders" as it interrupts the line order.

Have a great weekend everyone!

. . .And We're Off!


Tomorrow is my first day of school with students!  It's time to meet a whole new "Forest of First Graders" as my outside, back to school bulletin board suggests.  I went for a Lorax and Truffula Tree theme to welcome my new students.  As I have said before, the best ideas are ones you have borrowed from another.  I was inspired by Mrs. Lodge, a librarian.  She made Truffula trees out of tissue paper, wire, pipe insulators and yellow duct tape.  She decided to blog about her idea.  Here's how my 3D Truffula Trees look.  I love them!  For the directions click here to be sent to Mrs. Lodge's Library.


One of the reasons why I enjoy first grade so much is because I can clearly see a huge progression from September - June.  They learn so much and magically go from being unable to read and write independently, to being sophisticated readers and writers before my very eyes.   This joy also leads to one of my biggest challenges about teaching first grade--starting over at the beginning in September!  I need to keep the learning ahead in mind and remind myself that it's time to start at the beginning; they'll get there.  I'm looking forward to a great school year and to continuing to share ideas with you.  Good night!  May we all have a spectacular 2012-2013 school year.


Mr. Giso's Room to Read's Bright Idea #6

Create a Days of School Puzzle Countdown

My school neighbor and first grade team member encouraged me to share this idea and pictures, so here it goes!  In my library/ calendar area, I have two puzzles that serve as our "countdowns."  One is a 100 piece puzzle map of the United States which counts our way the the "One Hundred Day of School Extravaganza," and the other is an 80 piece puzzle map of the world which counts our way to the last day of first grade.  In all, this totals our 180 school days. Each morning during calendar time, the "Calendar Director" puts up a puzzle piece.  It's a lot of fun!  Here's how I did it.

First, I put together each puzzle onto some heavy duty foam board.  The finished final 80 days of school puzzle looks like this.


Next, I took off each puzzle piece, one by one, and did the following.
•Attach Velcro to the piece and to its spot on the board making sure it was a perfect match.  The amount of Velcro depends on the piece's size.
•Wrote the same number twice.  Once on the piece, and again on its spot on the board.  Obviously, I started with 1!  I also chose to do the perimeter of the puzzle first and work my way around.
•Once this was done, I took apart the puzzle and placed the pieces in bags of 10 so that they are now easy to find. 

Here's the puzzle in bags.


Here's what each puzzle piece looks like.


Here's what taking the puzzle down and getting ready for the first day of school looked like last week.


Although this is both fun and suspenseful for my first graders, this bright idea serves a geography purpose too.  I've seen this idea on a lot of websites, but I chose to do it with maps.  When we get to the states, we go over each state, its capital, our neighbors (Canada and Mexico) and chief products/natural resources.  When we get to the world map, we go over major cities, continents and animals found in the area.  My first graders love it!  This could turn into a great Labor Day project for you.