Image Map
Showing posts with label Classroom Makeover. Show all posts

Mr. Giso's Room to Read Bright Idea #15

Desk Chair Makeover


I gave my desk chair a quick 2 minute makeover.  Here, you can see my desk chair before the makeover.


All I had to do was stretch one cover over the back cushion and the second cover over the seat cushion.  Each cover has an expandable elastic and is supposed to be one size fits all.  I was skeptical at first, but it did fit perfectly with no trouble!  Take a look.


I'm honestly not sure how I stumbled upon this, but it was most likely by doing an Amazon search for "orange" for obvious reasons (it's my favorite color).  These covers are made by Deisy Dee and are described as being perfect for computer office chairs.  Click HERE to order.  Here's the final result.  


Loving My New Classroom Alphabet

It's time to get ready for another school year!  This summer, I decided to give my classroom alphabet a makeover, and I'm very pleased with the results.  Let's start with my old alphabet.  It looked like this.


It looks pretty good, but I wanted my front classroom wall to appear a little less cluttered.  I decided to go with a banner style alphabet because these triangle, banner-like signs are all over blogs these days.  I chose colorful backgrounds that had hints of oranges and warm tones which go nicely with my classroom colors (orange, brown and blue).  Here is my favorite clip art, the pizza for the letter "p."


I hung up the letter signs using orange ribbon and those heavy duty 3M hooks.  Here's a pic that shows this.  Because I had used the clips before, I hot glued them instead of buying those replacement sticky mounting pieces--how's that for saving some money?


To match, I dyed my own clothespins by putting them in Rit dye for about half a day stirring occasionally.  Of course they had to dry overnight.  This was a quick and fun DIY project that I had always wanted to do.  Summers are just perfect for that!  I have many clothespins left over.  


So happy with the end results!  It looks clean and colorful.  I really like how it freed up some wall space to make the overall appearance uniform, colorful and uncluttered.  


Click HERE for more information on grabbing this alphabet.


A New Beginning

Well, it's been quite some time since my last post.  I know, I know--wrist slap.  In my defense, here's a list of things that have kept me from the Blog World.  I'm not making excuses, just sharing.


1.  I taught a Summer Session I course--it was new to me, so lots and lots of work.
2.  I co-directed a summer program for about 100 readers, writers, scientists and artists; it ended last Thursday.
3.  I taught (and am still teaching) a Summer Session II course--also new to my course load--yikes!
4.  I took our state's mandated SEI endorsement, 3 credit course on sheltering content for English Language Learners which ended last Wednesday evening.
5.  I studied and passed the Early Childhood MTEL (fun teacher tests you take in Massachusetts), so I am now licensed to teach preK and K as well.
6.  Oh, and I packed.  After 15 years in the same school, I moved.  That's 15 years worth of "junk," I mean teaching tools, to move.  Double yikes.  Meet, the Carlton Innovation School.


All and all, I think it's safe to say it's been far from a summer vacation for me, but it's all good.  Moving on to more important things--my new school.  I've been lucky enough to be hired to work as a grades 1/2 teacher at the Carlton Innovation School, still in the same district.  This school, being an Innovation School, has been able to, under the direction of the principal, develop a program that best matches the needs of its learners.  The Carlton School's mission statement sums this up nicely: "The goal of the Carlton Innovation School is to meet the individual needs of our students.  Instruction takes place mostly in small groups through workshops in reading, writing, and math. The use of the Responsive Classroom program helps us create a community of learners while helping students grow socially and emotionally.  Our motto is to 'Try hard and learn a lot!'"

The school's Innovation Plan notes its school, curriculum and instruction structure.  Check it out by clicking HERE.  I'm super duper excited to have this opportunity to join the Carlton team for year two of this model.  Multi-aged classrooms, flexible groupings based on student need (as evident via assessments of course GRIN), project-based inquiry and team-teaching are a few perks that make this move an easy decision for me.  In addition,  I'm excited to join a dynamic staff.  (I've heard they are a bunch of fun-havers!) For more information on this fantastic school, check out Carlton's blog by clicking HERE.

I plan to blog my next few weeks of setting up my new classroom.
It's a tad bit smaller, with a tad bit less storage space--not that I'm
nervous or anything.  There's a storage closet right across the hall,
and I've already been given some shelves to fill.  Here's some 
pictures for you all.

Ah, here is a little glimpse of moving day.  Pictures include my Element, my boxes in the hall and the city's truck.  The city employee was the nicest mover, ever.


Now for my new classroom.  Boy do I have a lot of work ahead of me!  It's good work, though.  My theme is going to be a mixture of three colors: orange (my favorite), blue and brown.  I can't wait to see what it is like to have no desks for the first time in my teaching career.  Any helpful suggestions for me?


For those of you that started school this month, hope you are off to a great start.  For those of you like me who have to set up, good luck with that!


Diary of My Word Wall Makeover

This is my second blog post in my "Classroom Makeover Series."  After making significant improvements in my Mathematics Center for my first "Classroom Makeover," I had easily decided to go on to making over my supply cart.  One afternoon, however, I came across an old blog post (2011) on Word Walls inspired by the great Debbie Diller.  In Chalk Talk: A Kindergarten Blog, Mrs. Larremore sports her word wall with insightful recommendations based on Debbie Diller's Work.  Having incorporated this great blog find with some research of my own, my goals for this makeover included the following.

               1.  Improve the Location:  My prior word wall was located pretty far away from my four groups of students' desks.  In addition, I even had a rolling chart stand, an easel and some other furniture blocking parts of the word wall.  I know what you are thinking.  This is a big "no, no."

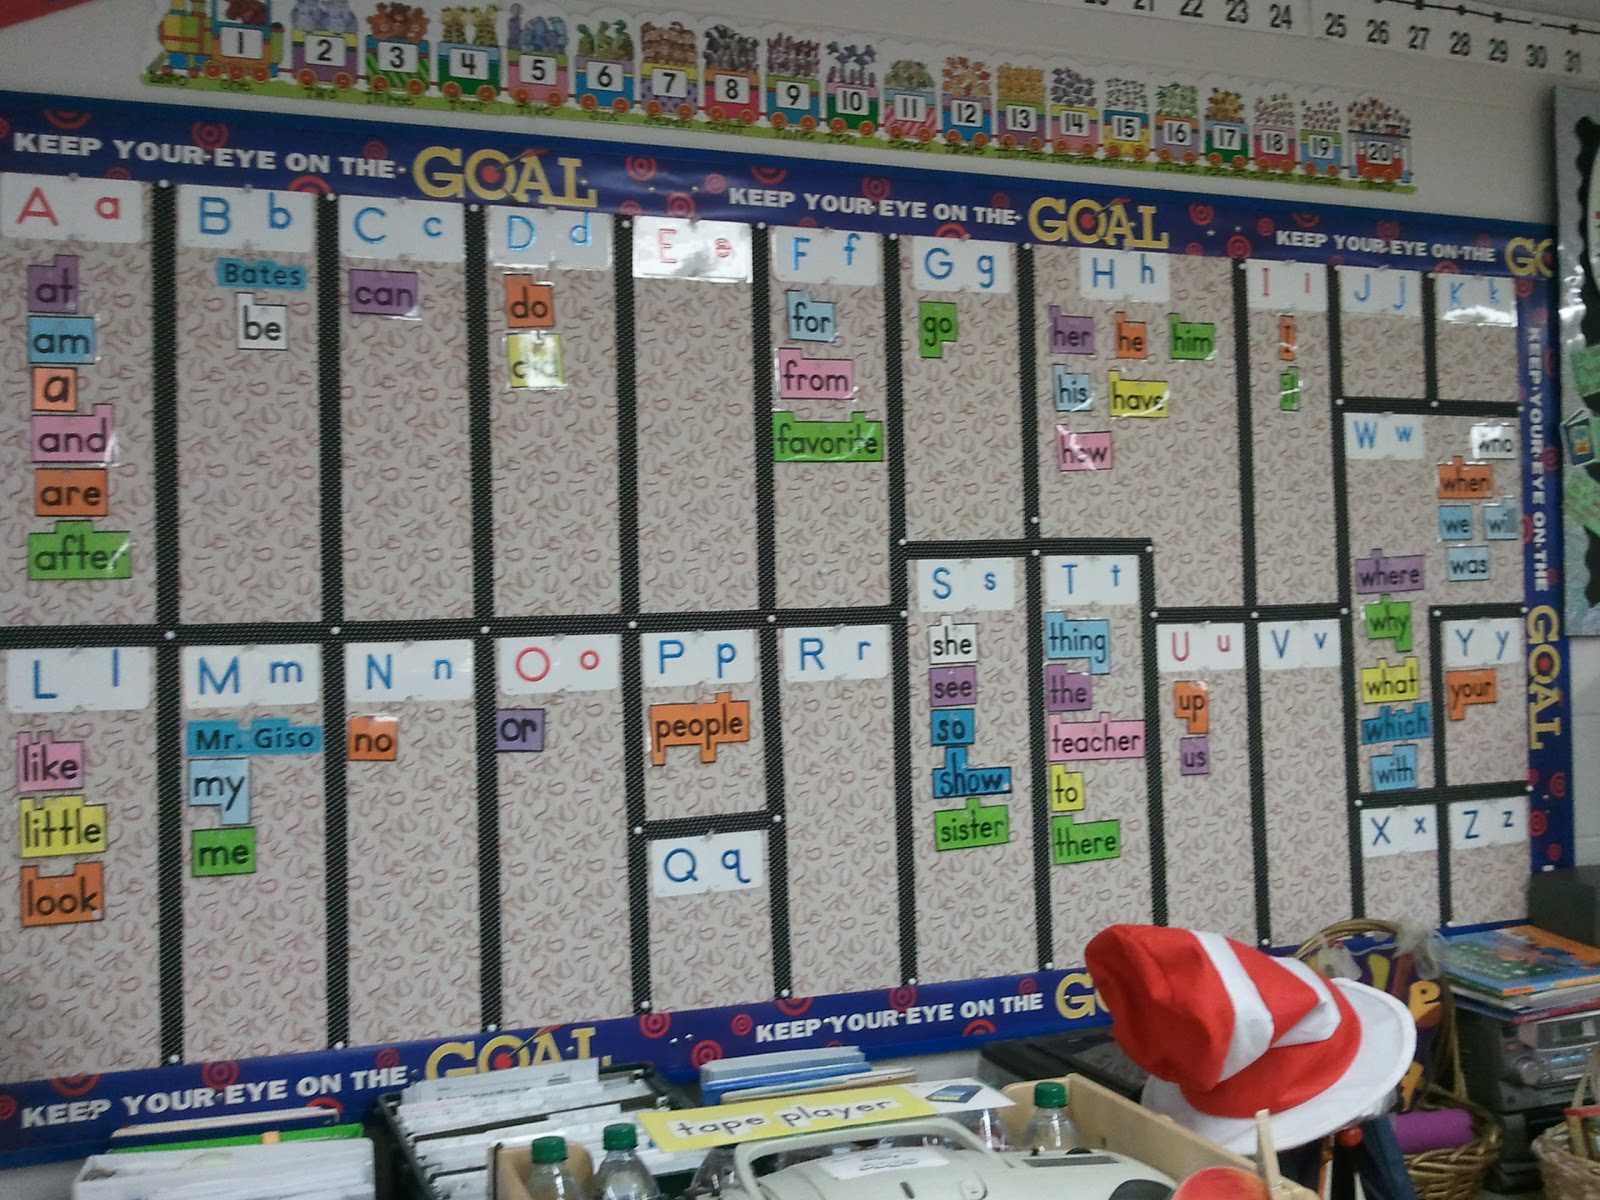
               2.  Make the Words Uniform:  My prior word wall words (purchased from a teacher store that shall remain nameless), were in many different colors with the words all trimmed according to the shapes of the letters.  This did not appear to be uniform, and was in fact a bit distracting to the eye.

               3.  Add a Picture to Reinforce Letter Sounds:  My prior word wall obviously had both upper and lower case letters, but did not have a picture to reinforce initial sounds.  I teach first grade, and not all of my young readers arrive knowing all of their letter sounds.  Since I add words to my word wall starting the first full week of school, having pictures along with my letter headings would be more effective to ALL learners from day one.

               4.  Increase the Space and Create an Organized Grid for My Word Wall:  The organization of my prior word wall was not balanced, visually.  It was measured according to how much space I needed for each letter.  For example, I had a large space for "W" because I knew I would have a lot of "w" words to put up.   This was due to a limited space on my bulletin board.  By creating a grid with electric tape and by moving my word wall to where there's more space, I knew it would be easier for my kids to use.

               5.  Utilize a Solid Background:  My words on my prior word wall were placed on a busy fabric.  This was definitely too distracting for my first graders.  

SO, with these goals in mind, I'm almost embarrassed to show these two before pictures of my word wall.  If you look closely, you will see it in the distance. 


Note that the ribbon border above was added right after I came across the blog by Chalk Talk.  I was so amazed at the difference it made, I kept on going with the improvements.  The brain definitely sees better with borders.  

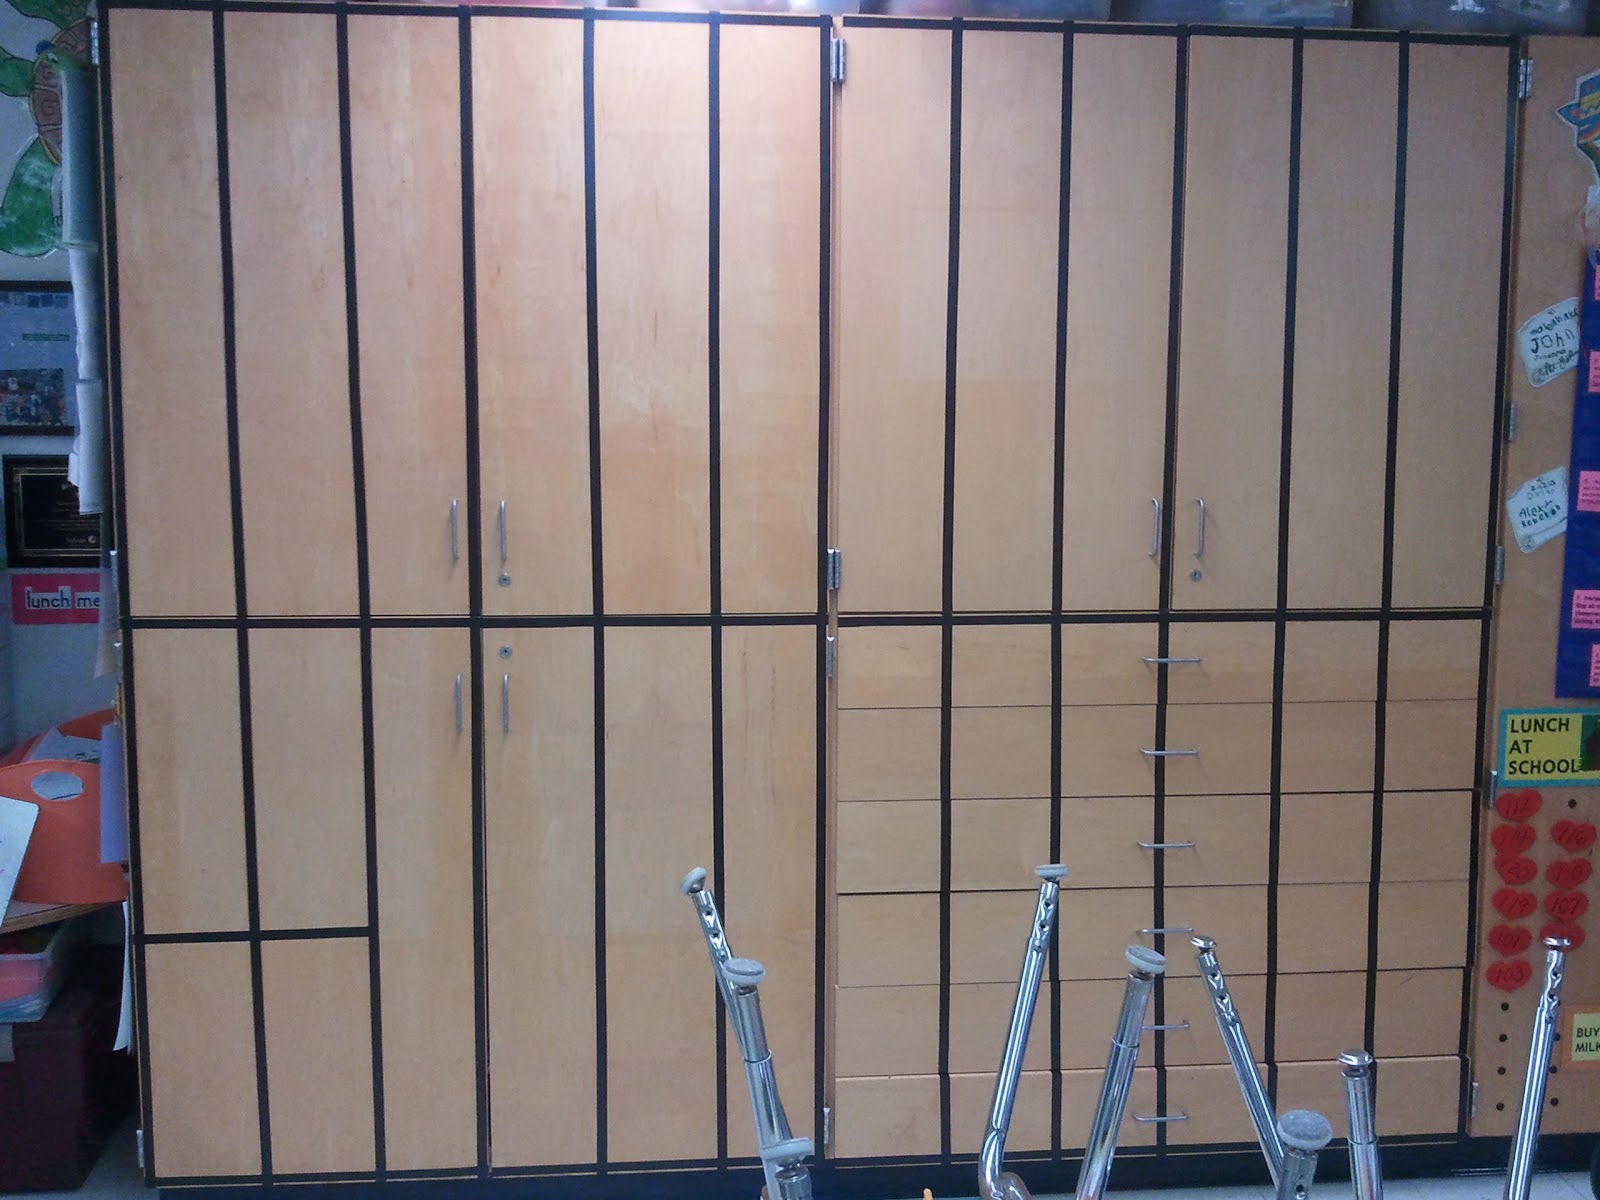
First, I removed all the store bought visuals from my cabinets.  I couldn't remember the last time my students used many of them.  Second, I purchased a bunch of this electrical tape and started measuring with my tape measure.


I decided to make a 2 by 12 grid in order to create 24 boxes for 24 letters of the alphabet.  I added the last two letters, Y and Z, at the bottom.  It looks a little bit like jail, I know, but boy does it look organized!   


Third, I went to work searching for the perfect font, frames and clip art to make my my letter headings and word wall words.  I trimmed, cut and laminated away.  Lots of words, words, words!  I colored the whole word yellow when it began with a vowel for easier recognition.


After this, my fourth and final part of this makeover was the most exciting.   I put up the letter headers and the words we had added so far.  Right away, you can notice the difference.  I decided to incorporate the headline, midline and baseline into each word to encourage my first graders to not only correctly spell, but to also correctly write each word with accurate letter formation.


Look how nicely the vowel "O" and its words stand out in yellow.


It was quite the project doing the tape work around my pull out drawers.  I even cut the letter headings, too and removed some hardware...shhhhhh.  Notice how the columns made with the electrical tape draw your eyes to each letter and its words so easily!  It's amazing how our brains work.


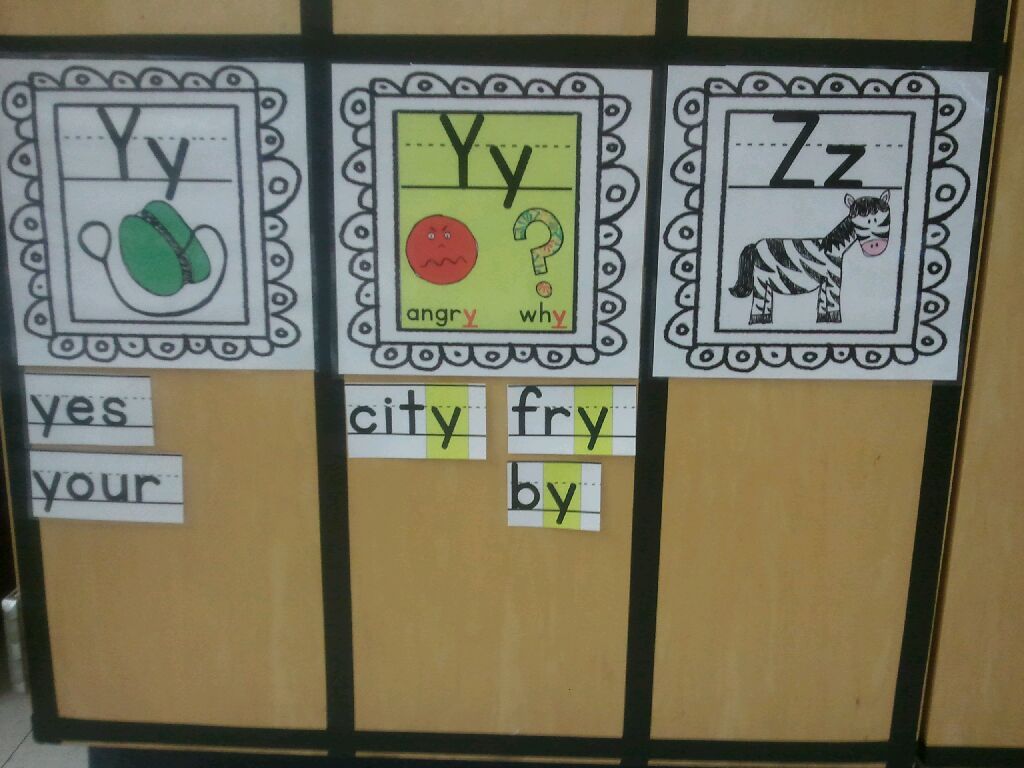
I decided to add a section for "Y" when it is used as a vowel.  Too often we just say "sometimes y" when we chant the vowels, but my new word wall offers a visual to reinforce the fact that "Y" serves as a vowel when it sounds like long "e" or long "i."  Check this out.


Last but not least, my finished product was ready.  My new Word Wall is right next to my students' desk groups and is most definitely easy to read.


To get the colorful letter headers, a "Word Wall" banner (not pictured) and the words included in the pre-primer to third grade Dolch List (plus more bonus words that I use), head on over to my TpT store by clicking here.  

Some Word Wall Suggestions for You to Consider

How does your word wall measure up?  You may want to consider the following.

•Do you have BOTH upper and lower case letters displayed in alphabetical order?

•Do you have your VOWELS in a distinct color in order for them to stand out from the consonants?

•Do you (for Pre-K and K) have examples of environmental print up such as cereal names, fast food names, road signs, candy bars, etc.?

•Do you for (Pre-K and K) have the student names on the word wall to help them learn the sounds?

•Do you have appropriate high frequency words displayed in which you hold students accountable for BOTH reading and spelling them?

•Do you have your word wall displayed in your whole-class teaching area for easy visibility?

•Do you have your word wall low enough (for the younger grades)?

•Do you have an interactive component to your word wall (can students take the words off easily with magnets, Velcro etc.)?

•Do you have a grid with borders for each letter and its words?  Remember our brains are programed to "see in borders!"

•Do you have the words large enough, in black, and on a solid background without patterns or loud borders?

•Do you have interesting vocabulary words in addition to high frequency words in grades two and up?

•Do you (for grades Pre-K to grade one) feature a picture to accompany each letter to foster phonics?

•Do you have tools for word work nearby (pointers, wands, magnetic letters, letter tiles, etc.)?

I hope I've inspired you to make your word wall more student friendly.  Let me know what you think.


Diary of My Mathematics Center Makeover

An itch for spring cleaning combined with the new Common Core State Standards for Mathematics put me to work throughout the month of February.  My goal was to give my Mathematics Center a makeover consisting of the following.

               1.  Updated Content:  The Common Core requires that I teach some new terminology and concepts such as the associative property of addition, and that students utilize a 120 Grid as opposed to a Hundred Grid, for example.  Also, some concepts are now deemed no longer appropriate for the first grade.

               2.  Less Clutter:  My bulletin board in my center-- although colorful and rich in appropriate content-- was very busy.  I found that my students rarely used the visuals without me prompting that helpful content was up on the board.  Furthermore, the table had hardly any room for the students to write on it or use it for centers.

               3.  Better Storage:  I wanted to be able to house more manipulatives in an organized, uniform way that was easy to identify where each manipulative was located.  I wanted a clean look.

               4.  More Usage:  I wished for there to be a way for my students to access the information on the bulletin board other than trying to see it from their desks or getting up and down, and up again, to find what they were seeking.

The results are finished!  Check out these two before pics.  I loved the center as is but wanted it to be even better.  Notice the busy bulletin board and crowded table.


Mathematics Center Before

Table Before
Here is my Mathematics Center after...drumroll please...


New and Improved Mathematics Center

One of the things that you may notice is how I tossed the mix and match bins and bought matching bins.  This made the same amount of "stuff" look less cluttered.  Here you see my find at a local Big Lots.  Gotta love those closeouts!  By creating labels for the bins, everything has a spot and everything is easy to locate.


Each of the posters you see on my bulletin board is now copied and laminated multiple times and stored in our Math Tool Box.  This way if someone wants a money or greater than and less than poster, they can just take the visual and bring it to their seats.  In the Tool Box are my new colorful 120 Grids, too.


I also updated my Estimation Station which includes a jar, a binder to record past estimates (for students to use for strategy purposes), record sheets for student estimates and a bin in which students place their completed estimates.


I also made a banner for the Math Center and used colorful clothespins and ribbon to hang it.


All the posters, labels, banner, 120 grids, estimation materials and more are featured in my newest item.   I cleverly titled it Common Core All in One Math Center.  You can click here to get it.  Now that my Mathematics Center has had it's makeover, I'm off to tackle the supply cart--the Mathematics Center's neighbor.  Wish me luck.