Image Map
Showing posts with label Classroom Organization. Show all posts

Organizational Tips for the Trade!


After fifteen years in the same school, I began a few summers ago packing and unpacking due to my decision to change schools. Once the city movers unloaded all my things, this photograph shows my classroom after a week of unpacking. YIKES! After days, it appeared as if I had not accomplished a thing.

Giso 3 1 250 

Now that the move is behind me, I’m pleased to be able to share some organizational tips with you. To begin with, an organized classroom library is essential to foster a love of literacy. Here you see a number of blue and orange tubs. These are actually coolers—the kind intended to fill with ice and cold drinks during a hot summer day. They double as sturdy book bins.

Giso 3 2 250

I’m always looking for ways to store things. Here you see some orange buckets. They are perfect for holding reading pointers, phonics phones, etc.  You can also see one of the many brown ottomans that I use for chairs around my guided reading table.  Inside of course, is storage perfect for running records, assessment folders, etc.

Giso 3 3 250

Teachers often ask me how I am able to store so many things in my classroom. The answer is that I put bins in high spaces. Here you see clear and colored tubs. In these, I place items that I don’t use on a regular basis, such as fabric, scraps, extra sentence strips, yarn, etc. Over the sink, I store my stickers in photo boxes—one for each month.

Giso 3 4 250

A great way to make things look neat and organized is to purchase plastic shoeboxes or similar sized tubs. They are relatively inexpensive, so you can buy them in great quantity. As you can see, rows of the same container look more uniform and tidy. What you don’t want to be seen, cover with fabric and tension rods. You don’t even need to know how to sew—just use a glue gun.

Giso 3 5 250

Another favorite way I keep things organized is by using hardware holders. This handy-dandy organizer is perfect for keeping tiny things in their places. I use it for my student banks (a form of positive rewards), magnetic letters, calendar pieces, etc. I suggest that you always glue an item on the outside for easy ID. Oh, and—BONUS!—they are fairly inexpensive, too.

Giso 3 6 250

If you are like me, you have loads of posters and a lack of wall space, or should I say FREE wall space. To solve this problem, get a portable clothes-hanger rack. These are way sturdier, less bulky, and cost tons less money than a pocket chart stand. I use one to organize my charts for instruction. This way they are easily accessible. I can put one up using the hanger and do not need to fuss over tape. Easy up, easy down.

Giso 3 7 250

I hope you have gained an idea or two and are off to organize your classroom. As I always say, an organized classroom is a well-managed classroom.  This summer, I'm at it again!  I'm not changing schools or positions, I'm just moving to the end of the hall.  Look forward to seeing me document this move from beginning to end soon.  Happy Summer!

Teacher Week '13 Day 3 ~ Organizing for Instruction

We are "Blog Hoppin'" our way through Teacher Week '13 in the blog world.  Today's topic is one of my favorites...organization for instruction.  I've decided to put together a Top Ten List of some of my "tricks of the trade" for classroom organization.

1.  Class Rules:  Use a pocket chart to organize them so that they can be taken out easily.  When a cherub of mine breaks a rule, I bring the card to him or her to reread the rule and to discuss what we can do to fix it.
2.  Check In:  Start the day off right with an organized check in system.  Here is what mine looks like.  Everyone starts the day off as being absent.  I use numbers instead of names so that I do not have to write them over year after year.
3.  Bins, bins, bins!:  I never put anything on a shelf that is not in a bin.  It makes things look organized, maximizes the space and keeps things tidy.  Also, I always label my bins.
4.  Hardware Holders:  This handy dandy organizer is perfect for keeping tiny things organized.  I use it for my student banks (a form of positive rewards), magnetic letters, calendar pieces, etc.  I suggest that you always glue an item on the outside for easy ID.  Oh, these are fairly inexpensive--BONUS!

5.  Portable Clothes Hangers:  These are way sturdier, less bulky and cost tons less money.  I use one to organize my charts for instruction.  This way they are easily accessible.  I can put one up using the hanger and do not need to fuss over tape.  Easy up, easy down.

6.  High Storage:  Utilize the tops of cabinets to store even more teaching supplies.

7.  Magnetic Shelves:  These are a great way to organize and to display holiday, theme and content books.  I got these from Calloway House.
8.  Shelf Benches:  I turned these shelves on their sides and made an instant bench.  They are a great way to give fun reading seating for buddy reading.  They also, yup you guessed it-- give you MORE storage.
9.  Easter Baskets:  I am a bit obsessive when it comes to these baskets.  They get really cheap after Easter.  They are definitely fun looking.  I use them to organize books, learning tools, etc.  I spy an Easter basket in this photograph...
10.  Centers on Wheels:  I use these rolling cart shelves to store centers.  This way I can turn any area into an instant center by rolling it over.  Here is my fluency center as an example.  This saves time.  I never need to search for my timers, flashcards, etc.

Well I hope you have scored some terrific tips.  I'm off to start checking in with you bloggers to see what inspires me.  Good luck!  Be sure to check out other bloggers by clicking HERE.


Diary of My Word Wall Makeover

This is my second blog post in my "Classroom Makeover Series."  After making significant improvements in my Mathematics Center for my first "Classroom Makeover," I had easily decided to go on to making over my supply cart.  One afternoon, however, I came across an old blog post (2011) on Word Walls inspired by the great Debbie Diller.  In Chalk Talk: A Kindergarten Blog, Mrs. Larremore sports her word wall with insightful recommendations based on Debbie Diller's Work.  Having incorporated this great blog find with some research of my own, my goals for this makeover included the following.

               1.  Improve the Location:  My prior word wall was located pretty far away from my four groups of students' desks.  In addition, I even had a rolling chart stand, an easel and some other furniture blocking parts of the word wall.  I know what you are thinking.  This is a big "no, no."

               2.  Make the Words Uniform:  My prior word wall words (purchased from a teacher store that shall remain nameless), were in many different colors with the words all trimmed according to the shapes of the letters.  This did not appear to be uniform, and was in fact a bit distracting to the eye.

               3.  Add a Picture to Reinforce Letter Sounds:  My prior word wall obviously had both upper and lower case letters, but did not have a picture to reinforce initial sounds.  I teach first grade, and not all of my young readers arrive knowing all of their letter sounds.  Since I add words to my word wall starting the first full week of school, having pictures along with my letter headings would be more effective to ALL learners from day one.

               4.  Increase the Space and Create an Organized Grid for My Word Wall:  The organization of my prior word wall was not balanced, visually.  It was measured according to how much space I needed for each letter.  For example, I had a large space for "W" because I knew I would have a lot of "w" words to put up.   This was due to a limited space on my bulletin board.  By creating a grid with electric tape and by moving my word wall to where there's more space, I knew it would be easier for my kids to use.

               5.  Utilize a Solid Background:  My words on my prior word wall were placed on a busy fabric.  This was definitely too distracting for my first graders.  

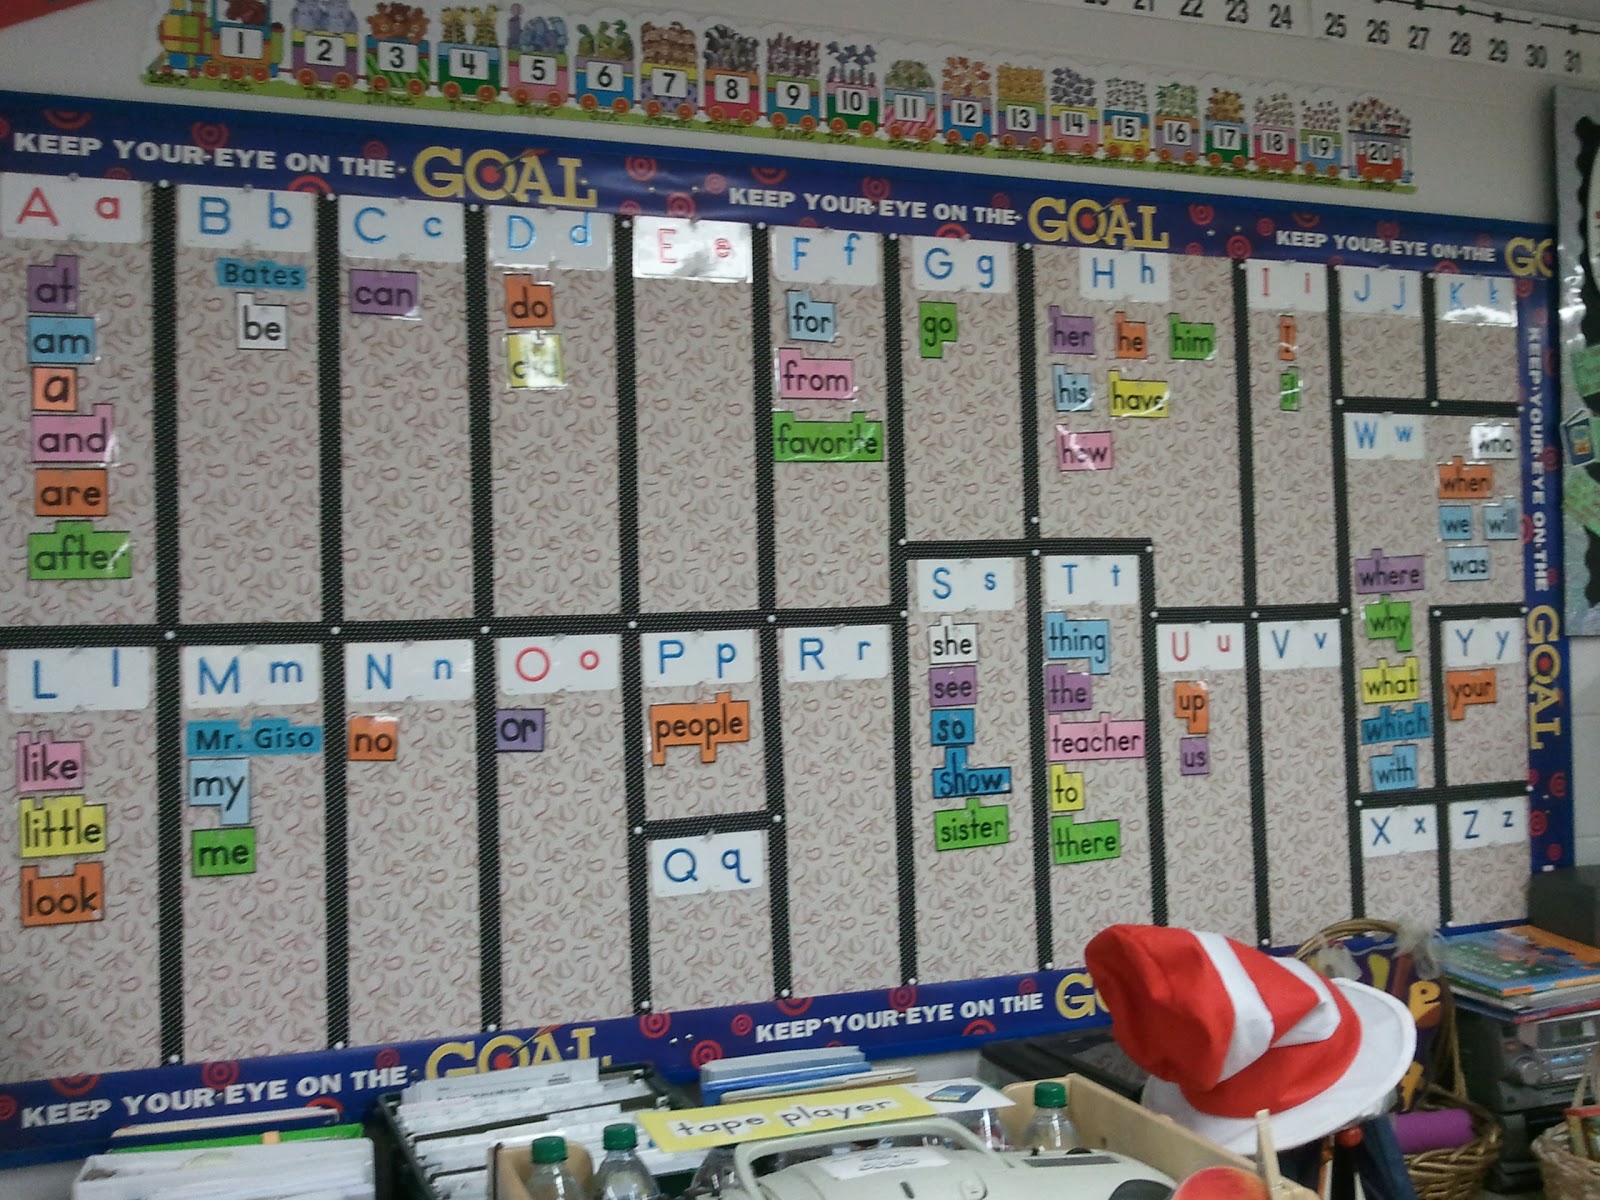
SO, with these goals in mind, I'm almost embarrassed to show these two before pictures of my word wall.  If you look closely, you will see it in the distance. 


Note that the ribbon border above was added right after I came across the blog by Chalk Talk.  I was so amazed at the difference it made, I kept on going with the improvements.  The brain definitely sees better with borders.  

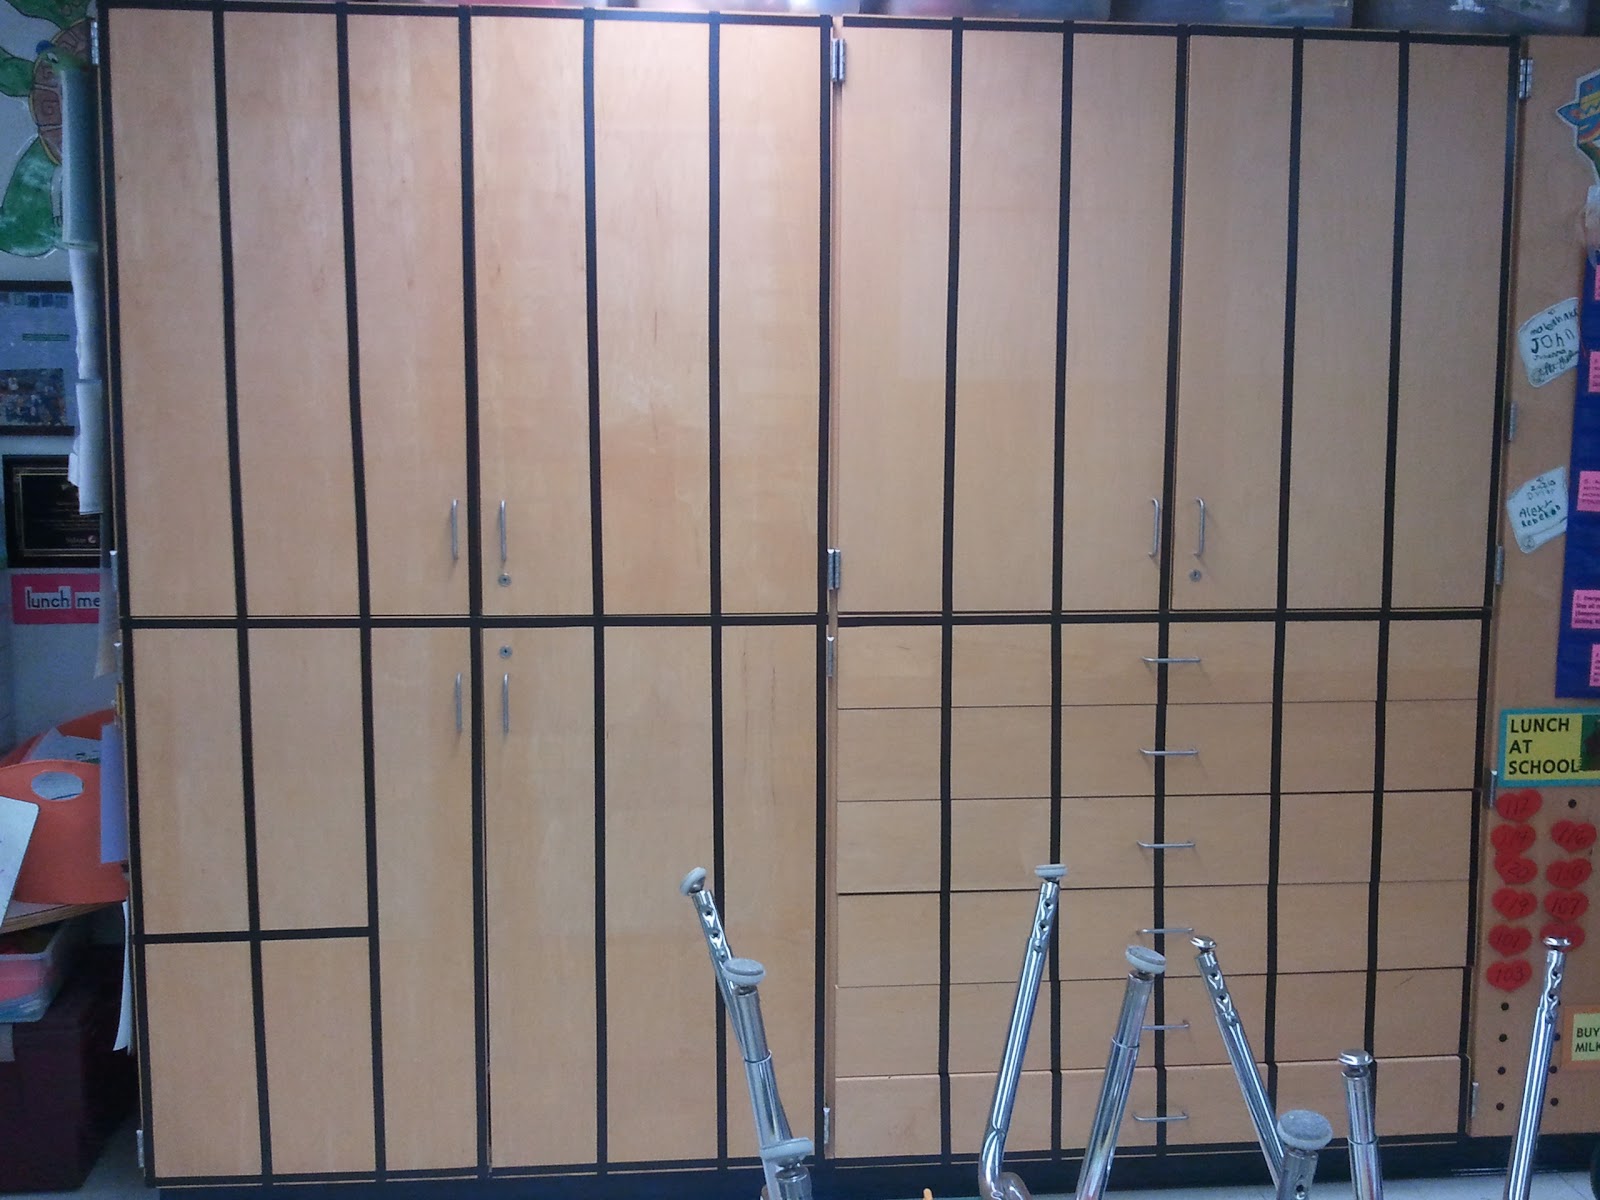
First, I removed all the store bought visuals from my cabinets.  I couldn't remember the last time my students used many of them.  Second, I purchased a bunch of this electrical tape and started measuring with my tape measure.


I decided to make a 2 by 12 grid in order to create 24 boxes for 24 letters of the alphabet.  I added the last two letters, Y and Z, at the bottom.  It looks a little bit like jail, I know, but boy does it look organized!   


Third, I went to work searching for the perfect font, frames and clip art to make my my letter headings and word wall words.  I trimmed, cut and laminated away.  Lots of words, words, words!  I colored the whole word yellow when it began with a vowel for easier recognition.


After this, my fourth and final part of this makeover was the most exciting.   I put up the letter headers and the words we had added so far.  Right away, you can notice the difference.  I decided to incorporate the headline, midline and baseline into each word to encourage my first graders to not only correctly spell, but to also correctly write each word with accurate letter formation.


Look how nicely the vowel "O" and its words stand out in yellow.


It was quite the project doing the tape work around my pull out drawers.  I even cut the letter headings, too and removed some hardware...shhhhhh.  Notice how the columns made with the electrical tape draw your eyes to each letter and its words so easily!  It's amazing how our brains work.


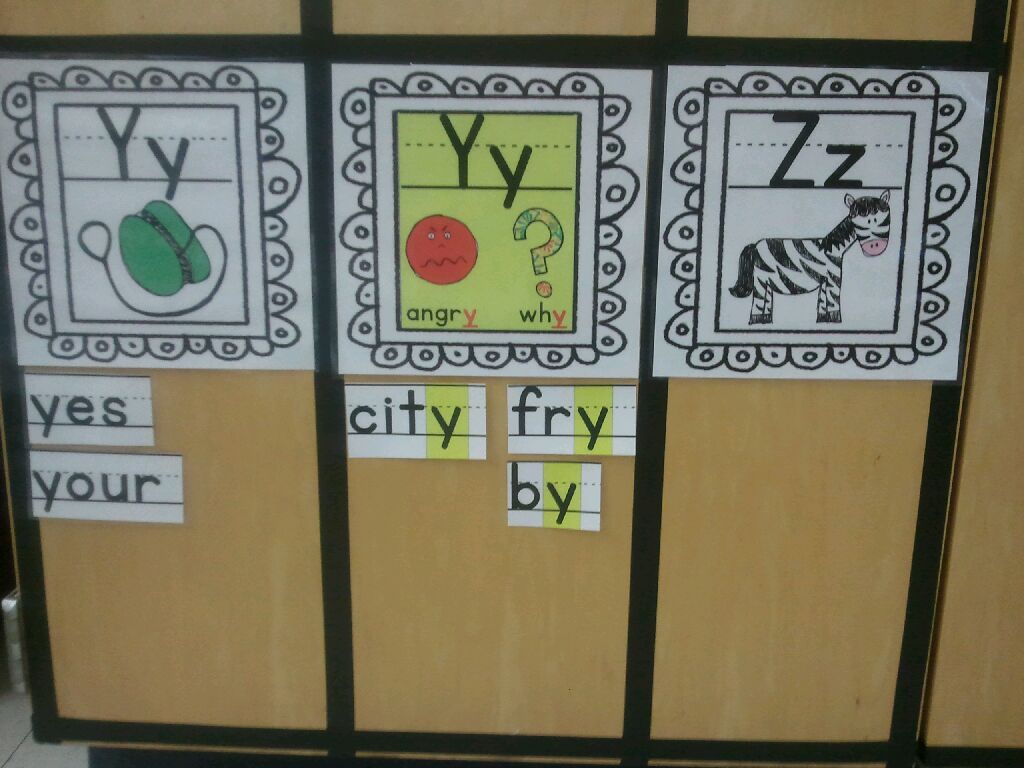
I decided to add a section for "Y" when it is used as a vowel.  Too often we just say "sometimes y" when we chant the vowels, but my new word wall offers a visual to reinforce the fact that "Y" serves as a vowel when it sounds like long "e" or long "i."  Check this out.


Last but not least, my finished product was ready.  My new Word Wall is right next to my students' desk groups and is most definitely easy to read.


To get the colorful letter headers, a "Word Wall" banner (not pictured) and the words included in the pre-primer to third grade Dolch List (plus more bonus words that I use), head on over to my TpT store by clicking here.  

Some Word Wall Suggestions for You to Consider

How does your word wall measure up?  You may want to consider the following.

•Do you have BOTH upper and lower case letters displayed in alphabetical order?

•Do you have your VOWELS in a distinct color in order for them to stand out from the consonants?

•Do you (for Pre-K and K) have examples of environmental print up such as cereal names, fast food names, road signs, candy bars, etc.?

•Do you for (Pre-K and K) have the student names on the word wall to help them learn the sounds?

•Do you have appropriate high frequency words displayed in which you hold students accountable for BOTH reading and spelling them?

•Do you have your word wall displayed in your whole-class teaching area for easy visibility?

•Do you have your word wall low enough (for the younger grades)?

•Do you have an interactive component to your word wall (can students take the words off easily with magnets, Velcro etc.)?

•Do you have a grid with borders for each letter and its words?  Remember our brains are programed to "see in borders!"

•Do you have the words large enough, in black, and on a solid background without patterns or loud borders?

•Do you have interesting vocabulary words in addition to high frequency words in grades two and up?

•Do you (for grades Pre-K to grade one) feature a picture to accompany each letter to foster phonics?

•Do you have tools for word work nearby (pointers, wands, magnetic letters, letter tiles, etc.)?

I hope I've inspired you to make your word wall more student friendly.  Let me know what you think.


Diary of My Mathematics Center Makeover

An itch for spring cleaning combined with the new Common Core State Standards for Mathematics put me to work throughout the month of February.  My goal was to give my Mathematics Center a makeover consisting of the following.

               1.  Updated Content:  The Common Core requires that I teach some new terminology and concepts such as the associative property of addition, and that students utilize a 120 Grid as opposed to a Hundred Grid, for example.  Also, some concepts are now deemed no longer appropriate for the first grade.

               2.  Less Clutter:  My bulletin board in my center-- although colorful and rich in appropriate content-- was very busy.  I found that my students rarely used the visuals without me prompting that helpful content was up on the board.  Furthermore, the table had hardly any room for the students to write on it or use it for centers.

               3.  Better Storage:  I wanted to be able to house more manipulatives in an organized, uniform way that was easy to identify where each manipulative was located.  I wanted a clean look.

               4.  More Usage:  I wished for there to be a way for my students to access the information on the bulletin board other than trying to see it from their desks or getting up and down, and up again, to find what they were seeking.

The results are finished!  Check out these two before pics.  I loved the center as is but wanted it to be even better.  Notice the busy bulletin board and crowded table.


Mathematics Center Before

Table Before
Here is my Mathematics Center after...drumroll please...


New and Improved Mathematics Center

One of the things that you may notice is how I tossed the mix and match bins and bought matching bins.  This made the same amount of "stuff" look less cluttered.  Here you see my find at a local Big Lots.  Gotta love those closeouts!  By creating labels for the bins, everything has a spot and everything is easy to locate.


Each of the posters you see on my bulletin board is now copied and laminated multiple times and stored in our Math Tool Box.  This way if someone wants a money or greater than and less than poster, they can just take the visual and bring it to their seats.  In the Tool Box are my new colorful 120 Grids, too.


I also updated my Estimation Station which includes a jar, a binder to record past estimates (for students to use for strategy purposes), record sheets for student estimates and a bin in which students place their completed estimates.


I also made a banner for the Math Center and used colorful clothespins and ribbon to hang it.


All the posters, labels, banner, 120 grids, estimation materials and more are featured in my newest item.   I cleverly titled it Common Core All in One Math Center.  You can click here to get it.  Now that my Mathematics Center has had it's makeover, I'm off to tackle the supply cart--the Mathematics Center's neighbor.  Wish me luck.

Mr. Giso's Room to Read's Bright Idea #11

Use a Hanging Closet Jewelery Organizer 
for Your Center Rotation Display

Looking for a way to display your center rotations that is quick to make, inexpensive, and (best of all) portable?  I've done magnets, Velcro, posters, pocket charts, index cards and those library card pockets that always rip--all to no avail.  I found this handy dandy jewelery organizer in a local craft store on clearance and knew I could use it for something.  They come in all sizes, shapes and patterns like this one...


When I brought it into school, I thought it would be perfect to use each row of the organizer as a center choice with popsicle sticks to display each student's name.  Since I already had my center icons, it was pretty easy to put together.  Here is what the whole thing looks like.  I can hang it anywhere.  Anyone that knows me would appreciate my being able to use the side of my easel for display purposes!  I'm not an animal print kind of guy, but it works for me.


Here's a close up of how nicely these little cards with each student's name fit into the pockets.


I have larger signs around the room (see below) that match the center icons.  Some of the clipart you see is free for teachers from Shutterstock.  Just click here to visit the website.  


Lastly, I have clipped a signed contract going over the rules for center time as we all know how crucial effective classroom management is for a successful and productive center block!  Hope this tip works for you.