Image Map
Showing posts with label TpT. Show all posts

Family Roots: A New Resource

This year, I am enjoying teaching our second grade social studies curriculum to my first and second graders.  This is in part to a series of activities I have created featuring my projects completed both at home and at school.  My newest unit (click HERE) incorporates these standards from the Massachusetts History and Social Sciences Curriculum Framework (2003).

•Explain the information that historical time lines convey and then put in chronological order events in the student’s life (e.g., the year he or she was born, started school, or moved to a new neighborhood) or in the history of countries studied. 


•Explain what buyers and sellers are and give examples of goods and services that are bought and sold in their community. 


•On a map of the world, locate all of the continents: North America, South America, Europe, Asia, Africa, Australia, and Antarctica.

•On a map of the world, locate the continent, regions, or and then the countries from which students, their parents, guardians, grandparents, or other relatives or ancestors came. With the help of family members and the school librarian, describe traditional food, customs, sports and games, and music of the place they came from. 


•With the help of the school librarian, give examples of traditions or customs from other countries that can be found in America today.


•With the help of the school librarian, identify and describe well-known sites, events, or landmarks in at least three different countries from which students’ families come and explain why they are important.


To kick off our study of family roots and family history I sent my students home with a letter introducing our new unit and asking families to list countries from their roots.  After that, we made a bulletin board with yarn and a map of the world with yarn depicting our roots.


Close Up of Each Student's Family Root Card


They really enjoyed studying flags and researching them in various atlases and online sources.  After this kick off, I sent home an at home project where my learners had to research one country out of the many that make up their family roots.  This at home project included making a family tree, placing their roots on a world map, listing historic landmarks from their country, describing foods, traditions and other cultural elements, etc.  It also asked families to research the influence on America as well as goods and services found in their chosen country.  When all were passed in, they were so excited and eager to share all that they have learned.  It was fantastic!


Other projects we enjoyed were creating family flags and making a mobile with each member of our family represented on it.  We made a class book of our "classroom family," designed family stamps and made personal time lines.   Here are some finished projects.


Family Mobiles


My Family Flag

My student teacher came up with the idea to introduce graphing by putting together a class graph of our roots by origin.  This product has a page for students to make their own graph--I liked this idea so much, I had to add it.  All and all, we learned so much from each other during this unit of study.  It's great to begin a new school year with it!


Accountable Talk Tools


Boy, has it been a long time since my last post!  I've been busy, to say the least, with teaching three courses this semester, loving my 1/2 classroom by day and shoveling, shoveling, shoveling the 3 feet + of snow that has plagued the Northeast.  Can we say seven snow days and school on two days during April vacation?

Since last year, my school has had professional development on Accountable Talk across all subject areas.  We want our learners to be thinkers--more than that.  We want our students to think deep, to encourage each other to think deeply and to be able to clearly and accurately explain their deep thinking to others.  We have had quite a few walk-throughs in order to measure our growth (anonymously) throughout our journey.  The results have allowed us to celebrate how far we have come and to plan our next steps to get even better!

Encouraging Accountable Talk in my classroom has been a learning curve.  I was challenged at first to figure out when I could talk and when I couldn't!  At the same time however, I was eager to push my students.  They were ready.

In mathematics one day, my principal and a team were doing a walk-through.  The children were very busy working on a non routine math problem (at the beginning stages).  They hadn't solved it right away.  Some weren't on the right path to getting the problem solved.  Some mathematicians were doing a lot of talking, but were saying incorrect information.  

At first, I thought this went wayyyyy wrong.  I wasn't sure if saying anything to the groups was OK.  Afterwards, my principal said something really powerful.  "You coach the talk, not the math."

Coaching the talking, not necessarily the content was an eye opener for me.  Because I teach first and second graders, my goal was to work on how we talk to each other.  To do this, I need to model it, scaffold it, reinforce it and model it some more!  It's OK to be doing the talking as the teacher when it comes to training our young thinkers how to use accountable talk.  I do this in a number of ways.

If a student appears to be challenged I may say, "How about talk to your team?  Tell them the specific part that has you confused."

If a group is finished with a problem early, I may say, "Talk to each other.  Come up with another way to show your thinking."

In a turn and talk, I am always reinforcing accountable talk "I notice how not only did you say you disagree with your partner's thinking.  You explained why with evidence from the text!"

From the above example, you can notice how I am coaching the talk, not the content of my lesson.  There are so many great resources out there to promote accountable talk.  


My teaching partner and I really like this one because of the icons that diving the type of talk from talk that will ask a question, to talk that will begin to state a friendly disagreement.

In my classroom, I made an Accountable Talk bookmarks and have hung up many banners with questions, response stems, etc.  Both are available in my TpT store by clicking HERE.  Below are some to which I refer when I want to push thinking during mathematics.


I have a whole banner of them over one of my large bulletin boards too.  I have modeled a few at a time over the course of this year.  The reading teacher and the speech therapist in my school have both hung some up in their classrooms too.


Here's what I have used to make handy dandy bookmarks or reminder cards for my students.


Happy weekend.  Melt, snow melt!

Loving My New Classroom Alphabet

It's time to get ready for another school year!  This summer, I decided to give my classroom alphabet a makeover, and I'm very pleased with the results.  Let's start with my old alphabet.  It looked like this.


It looks pretty good, but I wanted my front classroom wall to appear a little less cluttered.  I decided to go with a banner style alphabet because these triangle, banner-like signs are all over blogs these days.  I chose colorful backgrounds that had hints of oranges and warm tones which go nicely with my classroom colors (orange, brown and blue).  Here is my favorite clip art, the pizza for the letter "p."


I hung up the letter signs using orange ribbon and those heavy duty 3M hooks.  Here's a pic that shows this.  Because I had used the clips before, I hot glued them instead of buying those replacement sticky mounting pieces--how's that for saving some money?


To match, I dyed my own clothespins by putting them in Rit dye for about half a day stirring occasionally.  Of course they had to dry overnight.  This was a quick and fun DIY project that I had always wanted to do.  Summers are just perfect for that!  I have many clothespins left over.  


So happy with the end results!  It looks clean and colorful.  I really like how it freed up some wall space to make the overall appearance uniform, colorful and uncluttered.  


Click HERE for more information on grabbing this alphabet.


A Pocketful of Poetry for Poetry Month

Keep A Poem In Your Pocket

By Beatrice Schenk de Regniers

Keep a poem in your pocket

And a picture in your head
And you'll never feel lonely
At night when you're in bed.

The little poem will sing to you

The little picture bring to you
A dozen dreams to dance to you
At night when you're in bed.

So - -

Keep a picture in your pocket
And a poem in your head
And you'll never feel lonely
At night when you're in bed.

I really enjoy using this poem to introduce poetry month (April).  It's a nice tool for explaining to young poets how a poem is able to "paint a picture in your mind."  Poems are so special because of their short nature.  The poet must pay careful thought to EACH and EVERY word in a poem in order to achieve the precise feelings and imagery sought.  We are talking pretty heavy stuff here!  Can you tell I have been reading Lucy Calkins?

To celebrate poetry month, I start by making sure each of my young readers (for those of you that don't know, I teach a combination of first and second graders in an innovation school) have a book of poems in their browsing boxes.  They love this.  Among my favorites are Jack Prelutsky and Shel Sliverstein, of course.  I let them "book shop" for their own poems even though some may be a little bit off with their reading levels.  Shhhhhhhhhhhhh!

I also celebrate an addition to our Morning Meeting routine.  I place a poem of the day on my morning message easel.  We share it after we read the morning message and solve my riddle/joke of the day.  After we choral read the poem, I ask my students what do they think, feel or notice.  This question is vague and open ended, but I do this on purpose.  I want my young poets to discuss what the poem means to them, NOT to me.

In addition to these two new routines, I put out my Pocketful of Poetry center and resources.  It includes 18 task cards good for any poem.  Students simply select a poem and respond to the task card on the stationary provided.  Tasks include searching for rhyme, figurative language and themes.  They also include writing a critique, discussing the poem's setting, visualizing and discussing feelings.  

I also use my cards for sharing poems to change up the way we read poems with partners, in a small group, during guided reading, etc.  We experiment with choral singing, cumulative choral reading, line-a-child reading, call and response reading, dialogue reading, impromptu reading and refrain reading.  All of these cards (with what they mean) are available as part of my Pocketful of Poetry resource.

For my second graders, or advanced firsties, they take some time to look at a poem in a more technical manner using my Pocketful of Poetry Student Glossary.  They hunt through a poem and answer the questions provided with help of the glossary (written in child friendly language).  The items include rhyming pattern, rhythm, author's purpose, speaker, descriptive language, figures of speech, summaries, audience and critiquing.  This part of my poetry study can be done over, and over again.  Once I model the steps whole class, it's a great "What to Do When You Are Done" activity.

I did want to share some pics of my putting together this product over the weekend.  I made it last year, but am finally implementing it this year in my classroom.  I'm a busy guy; things take time you know.  

Here I went printing away.  This took awhile as there are a lot of pages in this resource.  


Next up was laminating and cutting, laminating and cutting--repeat.  I have my own personal laminator at home and another personal laminator at school.  I was tired of transporting them back and forth.  I'm not the only one with two, right?


I had a mini-3D display board that a colleague gave to me last year (Thank you, Judith).  She knew I would find something to do with it and, and she wasn't joking.  I had some extra chevron borders from September, so I glue-gunned them to make a fun border that matches the heading banner pocket.  


I used Velcro patches to attach the pockets to the display.  I attached the task cards this way so that the poets could grab a pocket and a poem, take both to their seats and get right to work.  When done, they would just place the pocket back on the display.  I numbered the board so they would match the numbered pocket back up appropriately.


And this, folks, is what you call my classroom-bound, finished product. 


Stop on by my TpT store for a detailed description of this product by clicking HERE.  Happy poetry month!  What do you do to celebrate?

Diary of My Word Wall Makeover

This is my second blog post in my "Classroom Makeover Series."  After making significant improvements in my Mathematics Center for my first "Classroom Makeover," I had easily decided to go on to making over my supply cart.  One afternoon, however, I came across an old blog post (2011) on Word Walls inspired by the great Debbie Diller.  In Chalk Talk: A Kindergarten Blog, Mrs. Larremore sports her word wall with insightful recommendations based on Debbie Diller's Work.  Having incorporated this great blog find with some research of my own, my goals for this makeover included the following.

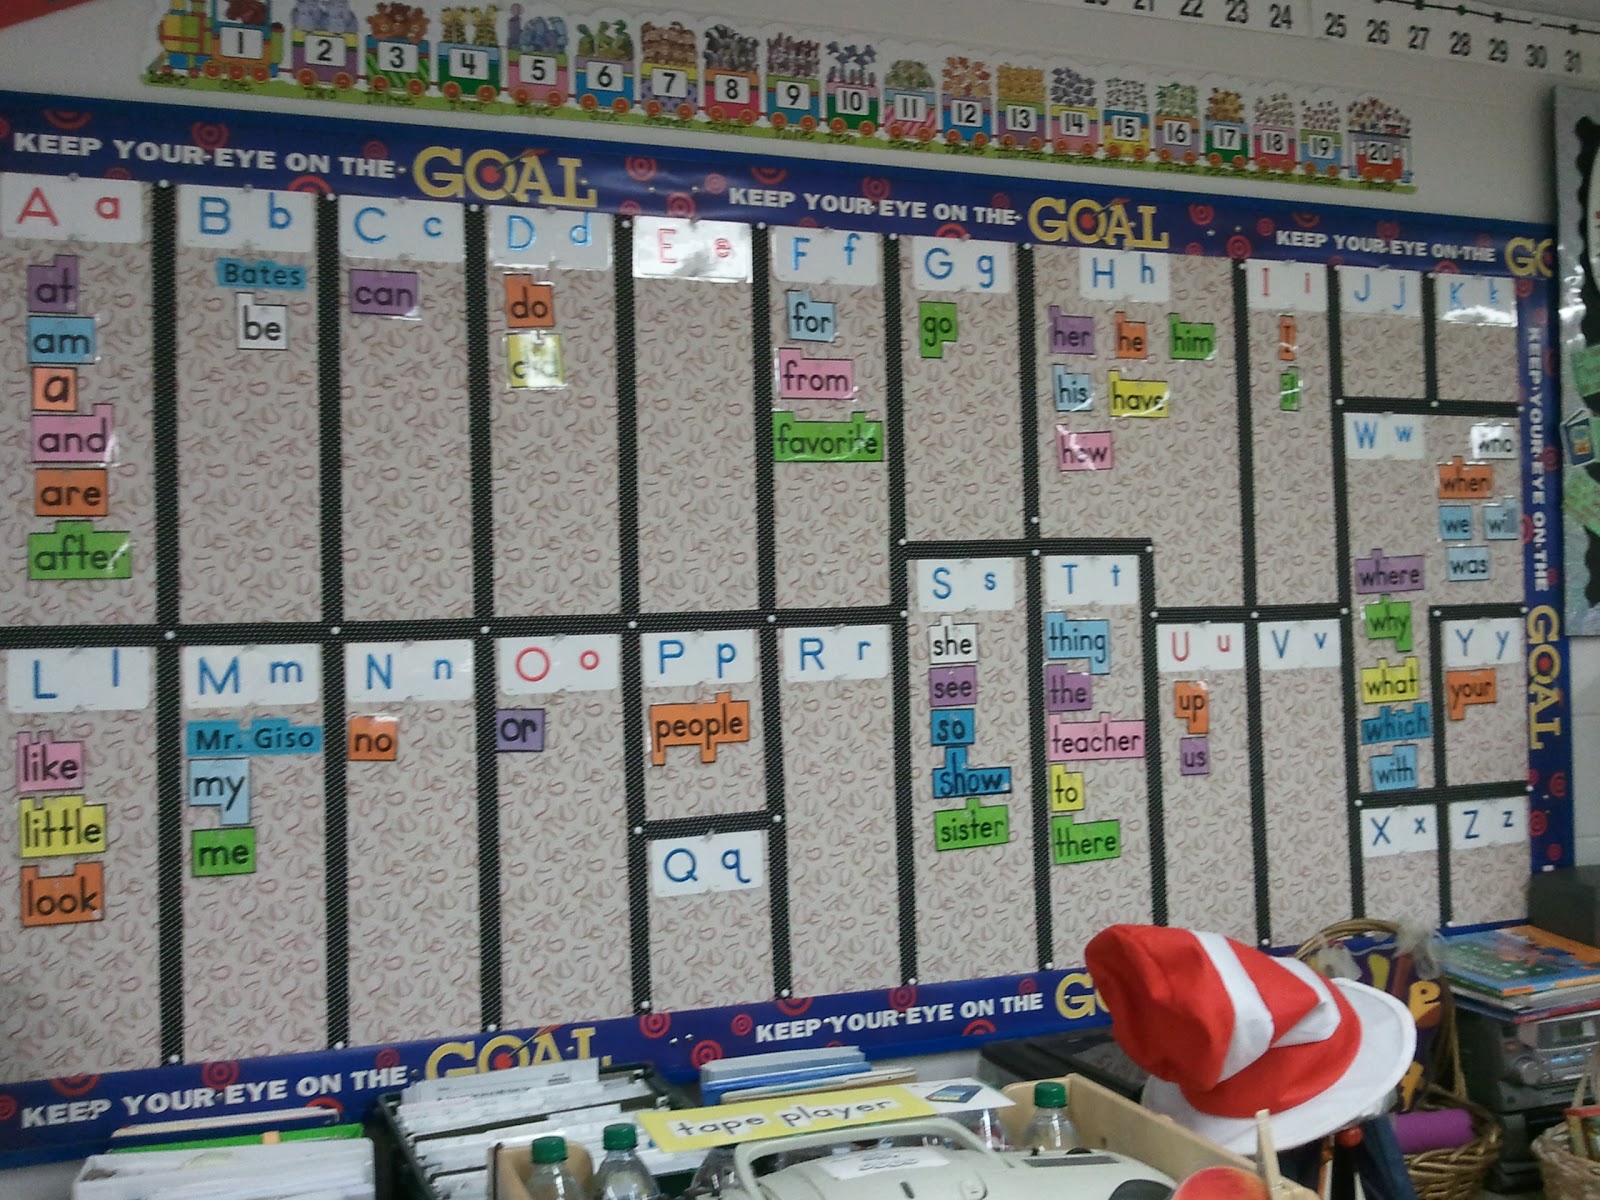
               1.  Improve the Location:  My prior word wall was located pretty far away from my four groups of students' desks.  In addition, I even had a rolling chart stand, an easel and some other furniture blocking parts of the word wall.  I know what you are thinking.  This is a big "no, no."

               2.  Make the Words Uniform:  My prior word wall words (purchased from a teacher store that shall remain nameless), were in many different colors with the words all trimmed according to the shapes of the letters.  This did not appear to be uniform, and was in fact a bit distracting to the eye.

               3.  Add a Picture to Reinforce Letter Sounds:  My prior word wall obviously had both upper and lower case letters, but did not have a picture to reinforce initial sounds.  I teach first grade, and not all of my young readers arrive knowing all of their letter sounds.  Since I add words to my word wall starting the first full week of school, having pictures along with my letter headings would be more effective to ALL learners from day one.

               4.  Increase the Space and Create an Organized Grid for My Word Wall:  The organization of my prior word wall was not balanced, visually.  It was measured according to how much space I needed for each letter.  For example, I had a large space for "W" because I knew I would have a lot of "w" words to put up.   This was due to a limited space on my bulletin board.  By creating a grid with electric tape and by moving my word wall to where there's more space, I knew it would be easier for my kids to use.

               5.  Utilize a Solid Background:  My words on my prior word wall were placed on a busy fabric.  This was definitely too distracting for my first graders.  

SO, with these goals in mind, I'm almost embarrassed to show these two before pictures of my word wall.  If you look closely, you will see it in the distance. 


Note that the ribbon border above was added right after I came across the blog by Chalk Talk.  I was so amazed at the difference it made, I kept on going with the improvements.  The brain definitely sees better with borders.  

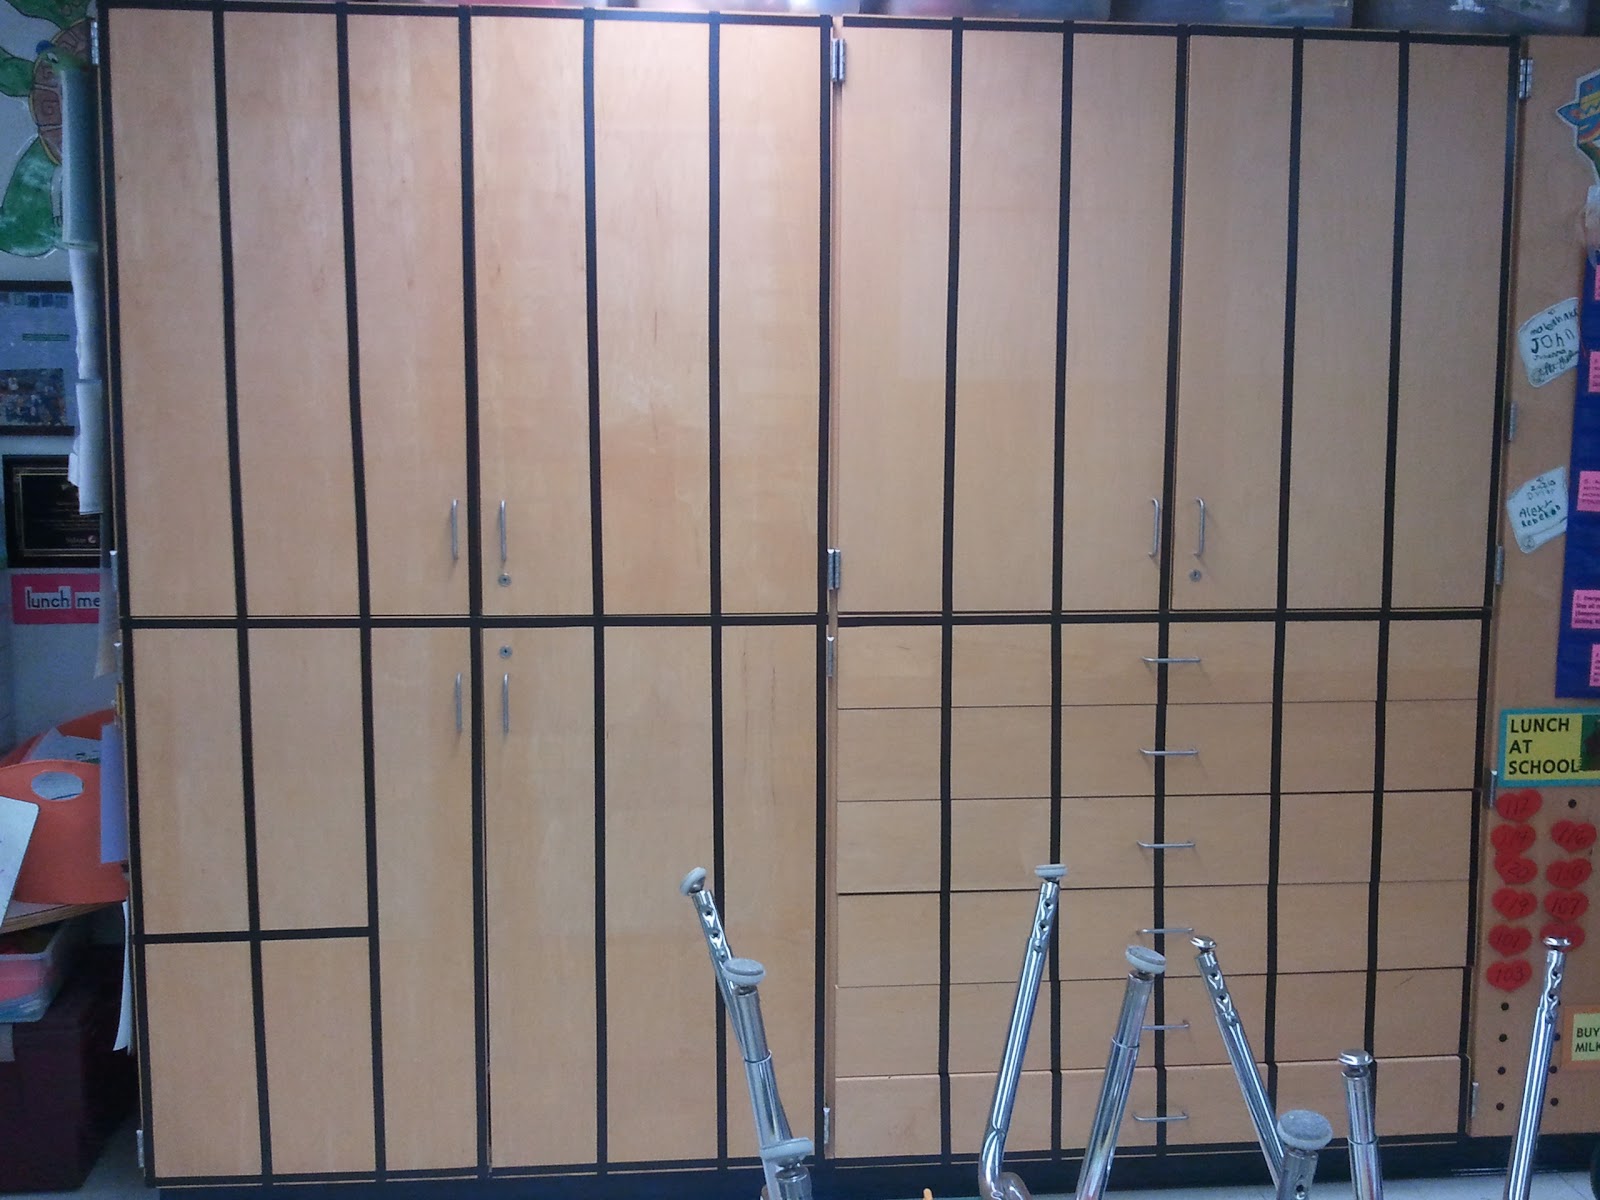
First, I removed all the store bought visuals from my cabinets.  I couldn't remember the last time my students used many of them.  Second, I purchased a bunch of this electrical tape and started measuring with my tape measure.


I decided to make a 2 by 12 grid in order to create 24 boxes for 24 letters of the alphabet.  I added the last two letters, Y and Z, at the bottom.  It looks a little bit like jail, I know, but boy does it look organized!   


Third, I went to work searching for the perfect font, frames and clip art to make my my letter headings and word wall words.  I trimmed, cut and laminated away.  Lots of words, words, words!  I colored the whole word yellow when it began with a vowel for easier recognition.


After this, my fourth and final part of this makeover was the most exciting.   I put up the letter headers and the words we had added so far.  Right away, you can notice the difference.  I decided to incorporate the headline, midline and baseline into each word to encourage my first graders to not only correctly spell, but to also correctly write each word with accurate letter formation.


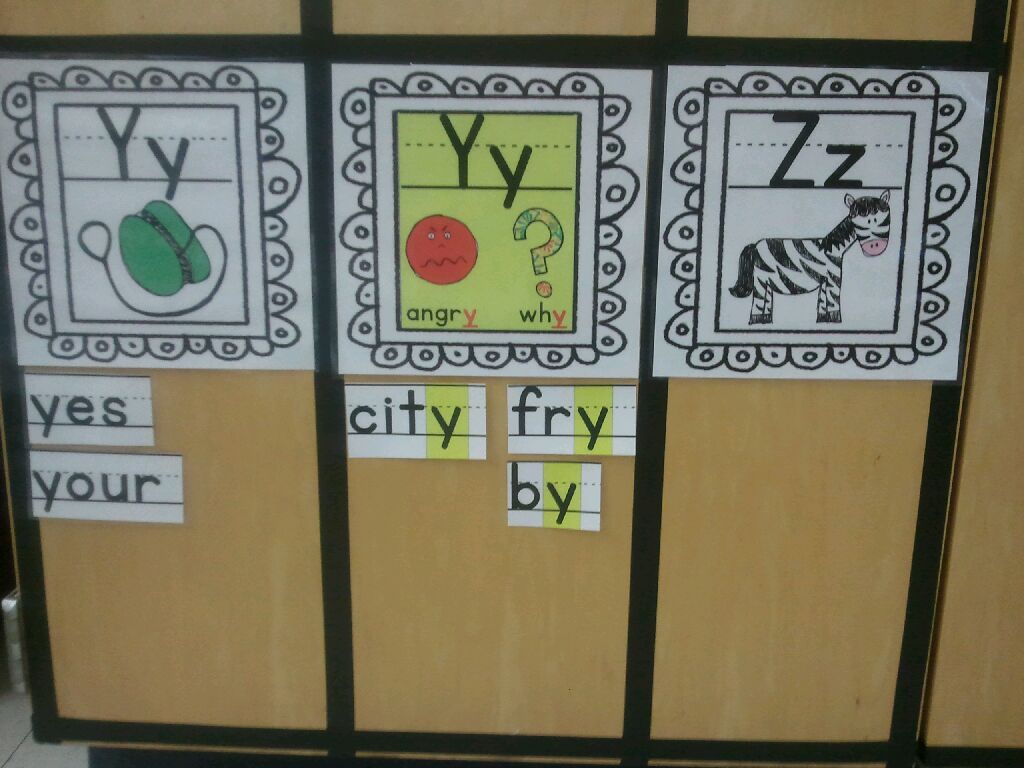
Look how nicely the vowel "O" and its words stand out in yellow.


It was quite the project doing the tape work around my pull out drawers.  I even cut the letter headings, too and removed some hardware...shhhhhh.  Notice how the columns made with the electrical tape draw your eyes to each letter and its words so easily!  It's amazing how our brains work.


I decided to add a section for "Y" when it is used as a vowel.  Too often we just say "sometimes y" when we chant the vowels, but my new word wall offers a visual to reinforce the fact that "Y" serves as a vowel when it sounds like long "e" or long "i."  Check this out.


Last but not least, my finished product was ready.  My new Word Wall is right next to my students' desk groups and is most definitely easy to read.


To get the colorful letter headers, a "Word Wall" banner (not pictured) and the words included in the pre-primer to third grade Dolch List (plus more bonus words that I use), head on over to my TpT store by clicking here.  

Some Word Wall Suggestions for You to Consider

How does your word wall measure up?  You may want to consider the following.

•Do you have BOTH upper and lower case letters displayed in alphabetical order?

•Do you have your VOWELS in a distinct color in order for them to stand out from the consonants?

•Do you (for Pre-K and K) have examples of environmental print up such as cereal names, fast food names, road signs, candy bars, etc.?

•Do you for (Pre-K and K) have the student names on the word wall to help them learn the sounds?

•Do you have appropriate high frequency words displayed in which you hold students accountable for BOTH reading and spelling them?

•Do you have your word wall displayed in your whole-class teaching area for easy visibility?

•Do you have your word wall low enough (for the younger grades)?

•Do you have an interactive component to your word wall (can students take the words off easily with magnets, Velcro etc.)?

•Do you have a grid with borders for each letter and its words?  Remember our brains are programed to "see in borders!"

•Do you have the words large enough, in black, and on a solid background without patterns or loud borders?

•Do you have interesting vocabulary words in addition to high frequency words in grades two and up?

•Do you (for grades Pre-K to grade one) feature a picture to accompany each letter to foster phonics?

•Do you have tools for word work nearby (pointers, wands, magnetic letters, letter tiles, etc.)?

I hope I've inspired you to make your word wall more student friendly.  Let me know what you think.


Diary of My Mathematics Center Makeover

An itch for spring cleaning combined with the new Common Core State Standards for Mathematics put me to work throughout the month of February.  My goal was to give my Mathematics Center a makeover consisting of the following.

               1.  Updated Content:  The Common Core requires that I teach some new terminology and concepts such as the associative property of addition, and that students utilize a 120 Grid as opposed to a Hundred Grid, for example.  Also, some concepts are now deemed no longer appropriate for the first grade.

               2.  Less Clutter:  My bulletin board in my center-- although colorful and rich in appropriate content-- was very busy.  I found that my students rarely used the visuals without me prompting that helpful content was up on the board.  Furthermore, the table had hardly any room for the students to write on it or use it for centers.

               3.  Better Storage:  I wanted to be able to house more manipulatives in an organized, uniform way that was easy to identify where each manipulative was located.  I wanted a clean look.

               4.  More Usage:  I wished for there to be a way for my students to access the information on the bulletin board other than trying to see it from their desks or getting up and down, and up again, to find what they were seeking.

The results are finished!  Check out these two before pics.  I loved the center as is but wanted it to be even better.  Notice the busy bulletin board and crowded table.


Mathematics Center Before

Table Before
Here is my Mathematics Center after...drumroll please...


New and Improved Mathematics Center

One of the things that you may notice is how I tossed the mix and match bins and bought matching bins.  This made the same amount of "stuff" look less cluttered.  Here you see my find at a local Big Lots.  Gotta love those closeouts!  By creating labels for the bins, everything has a spot and everything is easy to locate.


Each of the posters you see on my bulletin board is now copied and laminated multiple times and stored in our Math Tool Box.  This way if someone wants a money or greater than and less than poster, they can just take the visual and bring it to their seats.  In the Tool Box are my new colorful 120 Grids, too.


I also updated my Estimation Station which includes a jar, a binder to record past estimates (for students to use for strategy purposes), record sheets for student estimates and a bin in which students place their completed estimates.


I also made a banner for the Math Center and used colorful clothespins and ribbon to hang it.


All the posters, labels, banner, 120 grids, estimation materials and more are featured in my newest item.   I cleverly titled it Common Core All in One Math Center.  You can click here to get it.  Now that my Mathematics Center has had it's makeover, I'm off to tackle the supply cart--the Mathematics Center's neighbor.  Wish me luck.